 A few years ago as a pre-ABD graduate student, I wrote a post for the blog that has proved to have a longer shelf-life than most. That post, “Digital Workflow for Historians,” laid out how I used two programs, Papers and Scrivener, to manage my research and writing process. At the end of that post, I offered to share my project template and Chicago-style Compile (or export) preset. Over three years later, I still get emails on a monthly basis asking for those files. Following a discussion on Twitter last week about using Scrivener, it seemed the time was right to revisit the topic and to show how I ended up using Scrivener throughout the dissertation process, from organizing my research to producing drafts and revisions of chapters.
Much of the basics regarding Scrivener can be found in that previous post, so, if you are wholly unfamiliar with the application, I suggest reading that portion of the post. Scrivener has been around for a long time now and was originally designed for novelists and screenwriters. Immediately after first seeing the GUI, I could see the ways in which it could be easily adapted for historians. In that first post, I was describing how I used Scrivener for a journal article length piece of writing. But today I want to focus on how I have used it to produce a much longer piece of writing with a much larger amount of research.
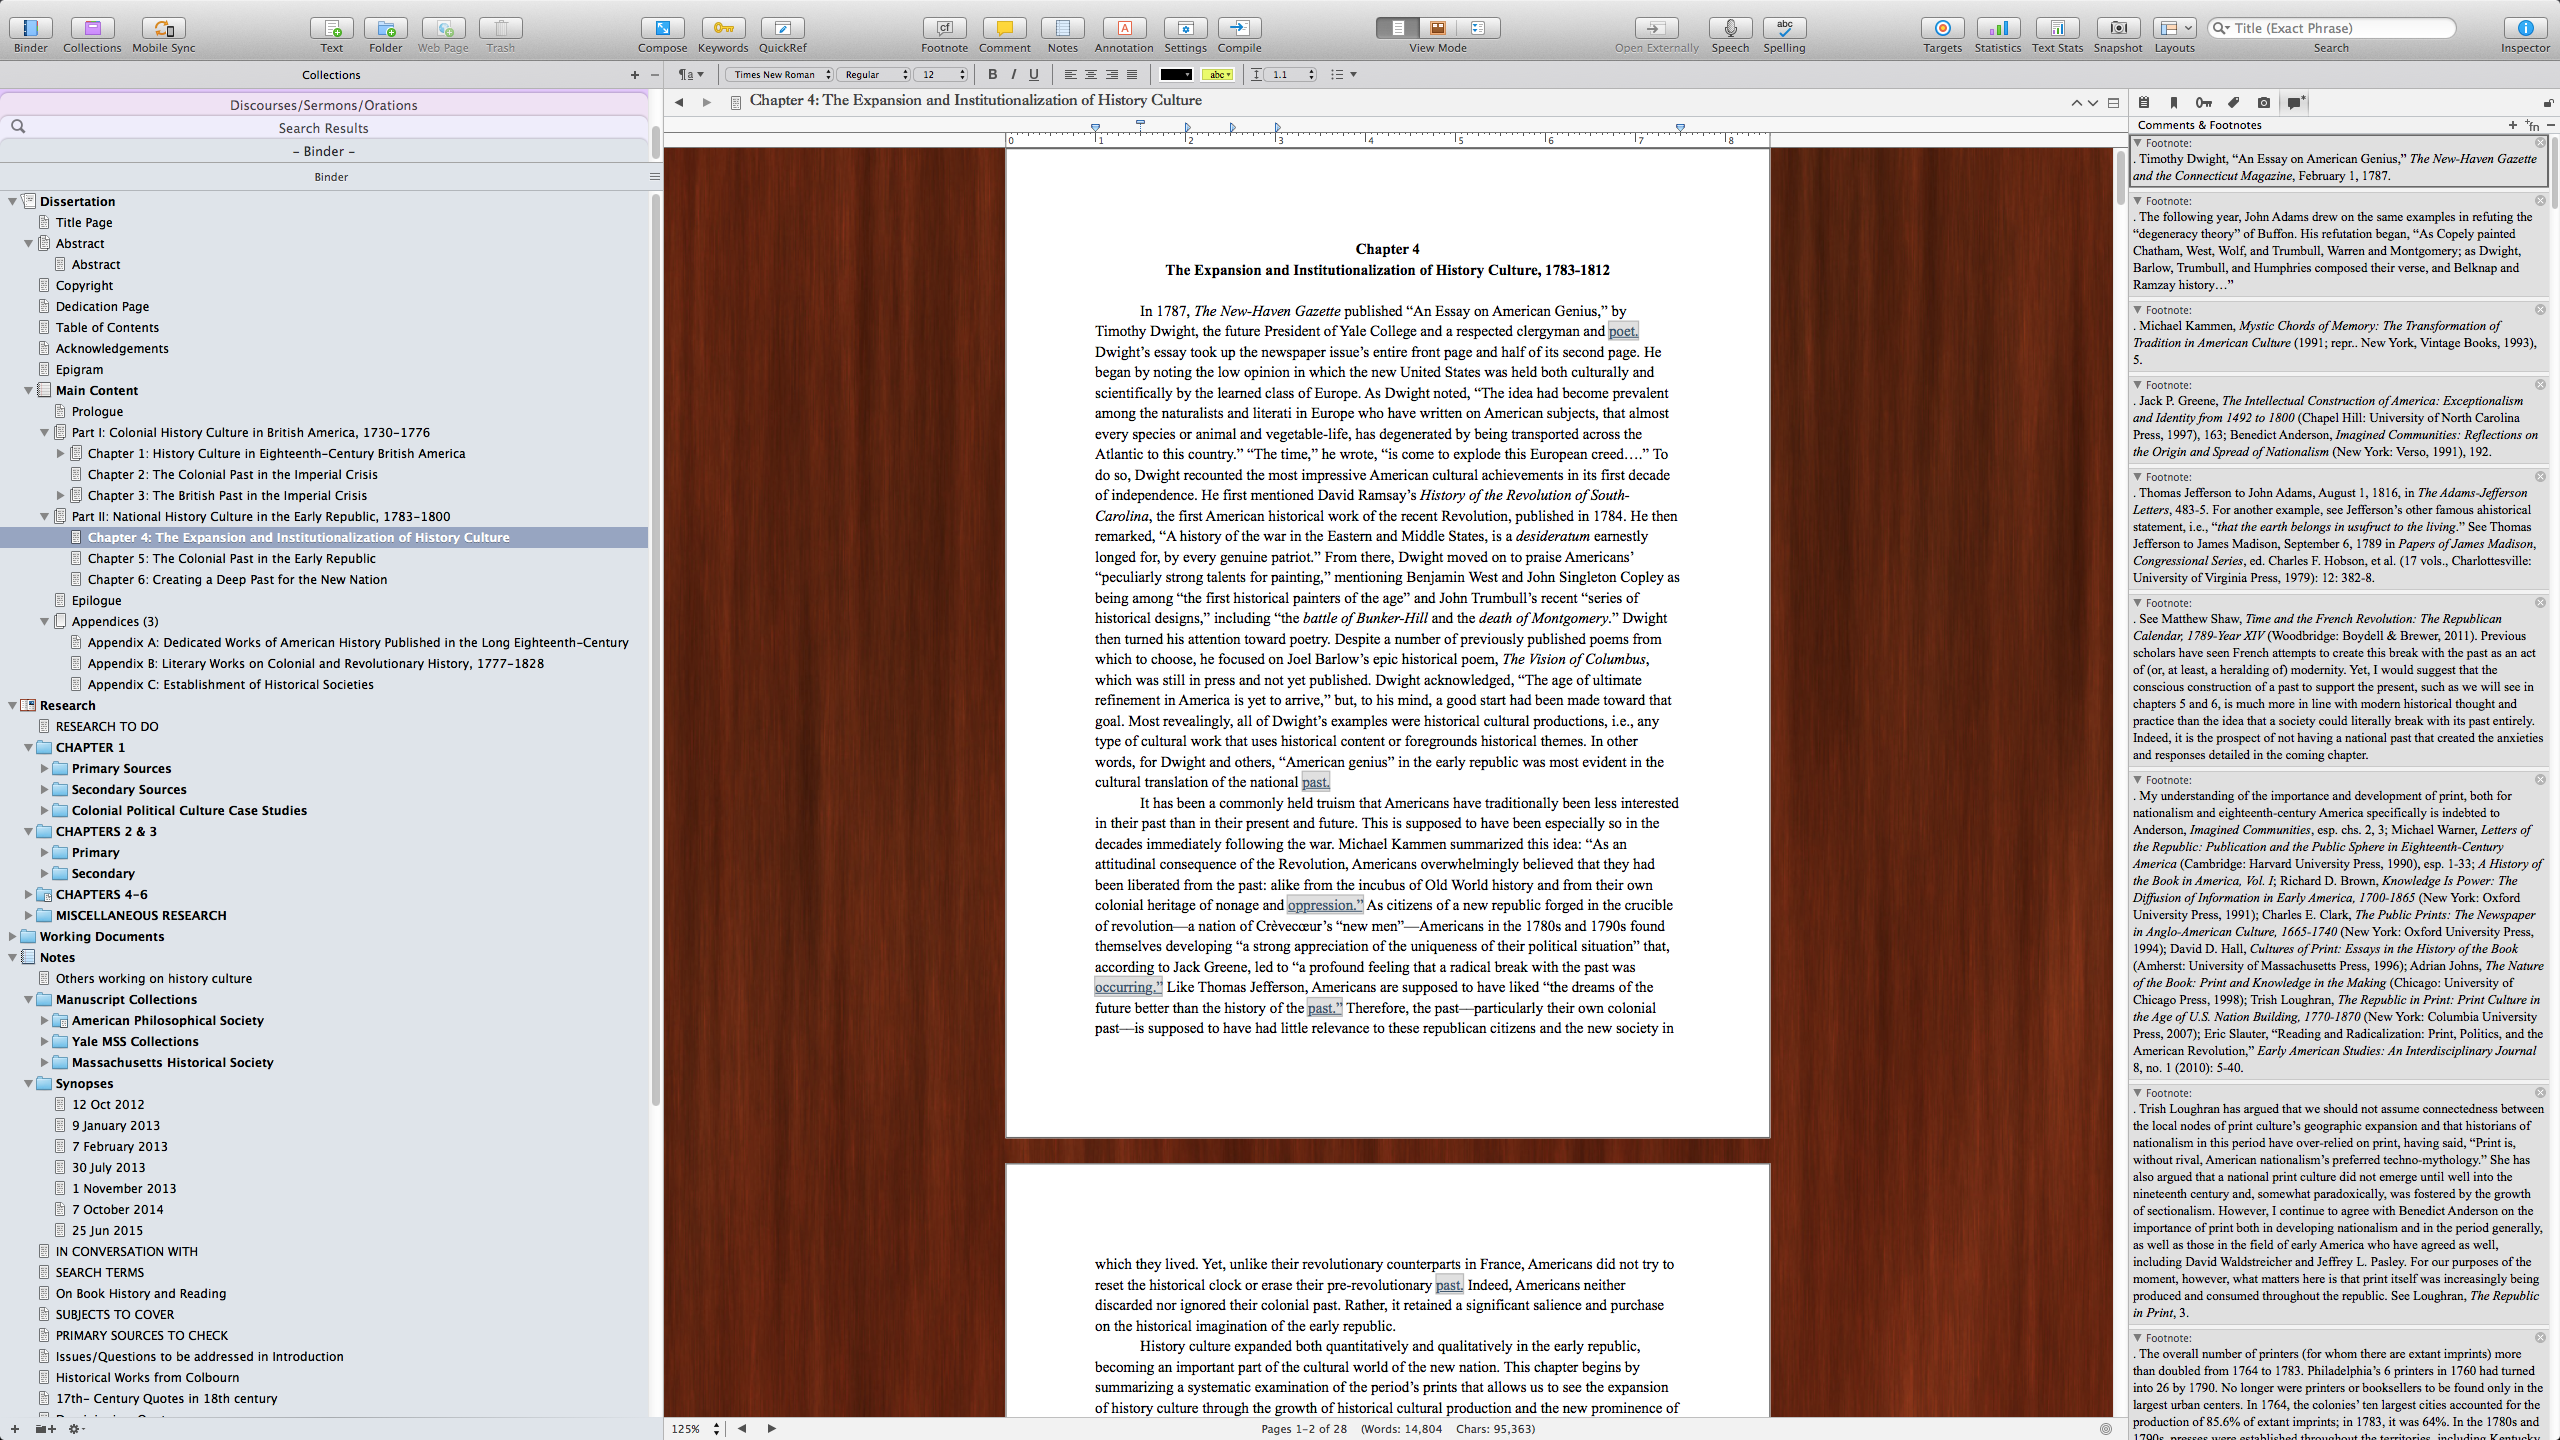
As you can see from the screenshot above (click for full-size view), Scrivener organizes material in the left sidebar or “Binder.” At the top is the main document that you are writing, i.e., “Dissertation.” Using individual text documents, I created the structure of the dissertation in Parts and chapters. During the initial phases of the project, each chapter also had various subdocuments related to each of the chapter’s major themes. For example, I might have a subdocument under a chapter for the chapter’s introduction. Then subsequent subdocuments for each distinct part of the chapter. In this way, the Binder allows you to break down your work into manageable sections. Once I had drafted a chapter, I would combine them into a single chapter document. This would be especially helpful for people writing chapters that rely on subheadings for organization. Needless to say, the structure of my dissertation changed a lot over the course of writing it and early on, thanks to the nature of Scrivener’s Binder, I was able to shuffle pieces of writing around, both within a chapter and, if necessary, from one chapter to another. Ultimately, in addition to acting as a way of structuring your work, the main document in the Binder also serves as an outlining tool and a visual representation of the outline of your work.
 Below the main document folder is a folder that I simply call “Research.” One of the main benefits of the Binder is that it lets you organize all of your research into a complex file structure that is much easier to manage than if you were to do it through Windows Explorer or the Mac’s Finder. Scrivener will import most any kind of file you would need in performing historical research. Because my project focuses heavily on print culture, my research folders are full of PDFs downloaded from primary source databases. But I also have tons of pictures of documents from my archival research. It also lets you import hyperlinks, which is especially handy if you want to import a Google Book or a book on archive.org, as it will allow you to view the book within Scrivener. You can even import audio files, video files, and YouTube links and watch and listen to them within Scrivener.
Within my main “Research” folder, I have created detailed layers of subfolders. So each chapter gets its own folder with subfolders labeled “Primary” and “Secondary.” Within both of those (which often correspond), I include subfolders for each of the chapter’s main themes and topics. Beyond that, you could decide to give each individual repository at which you did archival research its own subfolder. How you want to do it and how far you want to go is up to you but even the most complex number of layers of subfolders is easy to view and work with in the Binder. And, ultimately, that is the beauty of Scrivener and its Binder. Not only does it make managing a large amount of different materials easy, it also acts as a one-stop location for all of your research and writing together (my Scrivener project file contains over 4,000 individual files and totals 26.8GB).
Besides the top-level “Research” folder, I also have a number of other top-level folders. These are usually called “Working Documents,” where I kept things like my dissertation prospectus, bibliographies, and even emails with my advisor and others offering feedback. I also keep a top-level folder called “Notes,” where I keep my random thoughts and other miscellaneous things. For example, every few months as the project progressed, I would write a 30-second spiel about the dissertation and I kept them all (dated, of course) in a subfolder called “Synopses” within the Notes folder. That has allowed me to see how my own thinking about the project most broadly has changed over time. Finally, I have two folders called “Fellowships” and “Conferences” where I would keep information and application/submission proposals.
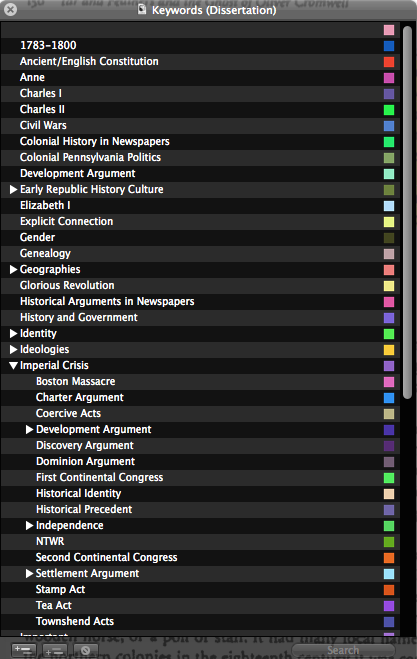 In addition to simply storing or managing your research materials, Scrivener has extensive tagging and metadata functionality. Honestly, I have not used the tagging and metadata functions as thoroughly as I hoped to in the beginning. Nevertheless, every item in your research folder gets a corresponding index card and notepad (the former of which can be viewed on a cork board). Every item can also be labeled, given a “status,” tagged with keywords, and tagged with metadata, all of which you define. For example, you can see some of my keywords in the screenshot on the right. They, too, can be structured however you like and can be added to a document, among other ways, by dragging the keyword onto the file in the Binder. Moreover, Scrivener’s Binder has a feature called “Collections” which lets you add specific documents to it and order them any way you want. For example, during a previous project, I used a collection to document a public debate by importing newspaper pieces, pamphlets, and scans of private correspondence and arranged them chronologically. Another critical aspect of Scrivener’s value in organizing your research is the degree to which it is almost completely customizable to whatever degree you are willing (or need) to take it.
Since we’ve talked about how I use Scrivener to manage my research materials, let me just say a few words about the writing process in Scrivener. Each of the documents you see in the main Dissertation folder is just a rich text file. When you import Word documents anywhere into Scrivener, they get immediately converted into rich text files. It is important to note that Scrivener is designed primarily to help you produce a first draft that can be exported (or, in Scrivenerian parlance, “Compiled”) into your chosen file format. Without the usual page layout controls one using Word might be accustomed to, Scrivener lets you just concentrate on the actual writing as opposed to formatting. There are caveats, however. Since it deals with rich text files, it handles footnotes by putting them in the right sidebar rather than in the text file (see above). This can be a bit strange at the beginning but you quickly get used to it. As noted above, though, the ability to break chapters down into bite-size pieces by giving each its own subdocument, helped greatly in not becoming overwhelmed when starting a new chapter from scratch. When you have a draft (of a chapter or the dissertation as a whole), you can choose to Compile it to a Word document. The Compile settings let you set all the standard page layout features including spacing and fonts as well as how to handle/format your footnotes.
Ultimately, I used Scrivener for my dissertation (and, likely, the manuscript to follow) because it provides a single space in which I do the vast majority of work. To have everything in one place is an enormous convenience that has become a necessity. And, because I keep my Scrivener project file in my Dropbox folder on my hard drive, it constantly updates with almost every change. That means I never have to worry about losing any of my work and I can pick up right from where I left off on my (or anyone’s) laptop or desktop. The other great thing about Scrivener is its customizability and flexibility. Scrivener can be setup for almost any kind of historical-related project one can imagine and tweaked according to each user’s own preferences. For example, I currently have a Scrivener project dedicated to the job market (where I work on and keep document drafts and information relevant to each job) and I usually create one for each class I teach. Now, despite the length of this post, I have only really touched on the very basics of using the application, so I am happy to answer any questions in the comments related to the application and how I’ve used it in writing my dissertation. And once again, I am offering a new dissertation/large project template file, my Preferences file, and my up-to-date Chicago-style preset file which can be downloaded here.

Thanks for this great post, Michael. Would you mind talking about how to use the tagging and metadata features?
I can’t upload pictures here but each document also gets a “Label” and “Status” drop-down menus, which you can customize. So for the former I use “primary source,” “secondary source,” etc… And for the status, I use things like “To Do,” “In progress,” “Completed,” and a number of others. The keywords I described above in the piece, which is probably the main way of traditionally tagging your documents. Finally, each document also has a “Metadata” tab in the right sidebar for which you can customize the fields. All of these things occur in the right sidebar. In addition, Scrivener’s search function is excellent and allows you to search for keywords in any part of the document or attending information/metadata/comments.
Do you also use Zotera to manage references? Does Zotera work in conjunction with Scrivner?
Gene (and David), I do not use Zotero with Scrivener so I can’t answer your question from my own experience. I actually prefer to type up my footnotes “by hand” and for bibliographies I use an application called Papers. I’m pretty sure you can drag a reference from Zotero into Scrivener and it will drop the formatted reference in your text or footnotes. But I don’t know if there is a CWYW-type way of connecting the two. A quick look on the very good user forums on the Scrivener website would likely answer that question quickly.
Thank you. I will try as I really like Zotero
Much of my research is in Zotero, so this is a critical element in considering using Scrivener.
While there is no direct integration, I have learned there is a plugin for Zotero that helps create a multi-step workaround if your final output is going to be to either Open/LibreOffice or MS Word. I’m still on the fence about Scrivener’s overall value to me, but I have tried the integration method linked below (method#2), and it does work:
http://dahl.at/wordpress/2014/02/05/scrivener-and-zotero/
Thank you!
Thanks for the great tutorial and the files.
This is great, as I’m currently doing my prospectus using Scrivener! As Gene Procknow asked, do you use Zotero with it? I’ve seen this method of integration but it still feels clunky… http://thedigitalresearcher.com/how-to-use-zotero-with-scrivener-part-2/
David, see my comment to Gene above.
However, is Scrivener freeware? Or does one have to pay for full features?
Scrivener is $45 but $38 for academics and students.
Also, I perhaps should have noted this in the post: I am not affiliated with Literature and Latte, the producers of Scrivener, and have not received any form of compensation for this post.
Nice post, Michael. I’ve done just about all my writing on Scrivener since fall, 2007, not long after it came out, and find it indispensable for how I work. Unlike with Microsoft Word, it allows for the writer to put conceptualization first, and reduces writing distractions. That said, as with other people on this thread, I also use Zotero, which means having to employ a workflow (as Carl linked to, above) for citations. Also, the iOS version, released (finally!) in July, works great on an iPad, and allows easy syncing through Dropbox. Scrivener’s built for long-form writers from the bottom up, and at this point, I can’t imagine, or at least don’t want to, writing otherwise.
Thanks, Andy! I could pretty much echo every one of your comments. I switched to Mac in 2009, primarily because I wanted to use Scrivener. I’ve used it for journal articles (and for teaching) but it’s real utility has been with the dissertation, i.e., long-form writing. At this point, I can’t imagine doing any kind of research/writing project without it. I am a huge hoarder of PDFs of both primary and secondary sources and simply could not manage such large numbers of files in any other way. And certainly not in a way that was wholly integrated into the actual process of writing. Like I said in the post, it’s the “one-stop” nature of Scrivener that allows my research and writing to be two parts of a single process and I have found that enormously helpful, both in conceptual terms and in terms of productivity.
Michael, I can’t get your files to function in my Mac version of Scrivener. Any advice would be appreciated.
TO USE THE FILES LINKED TO IN THE POST:
1) Find PREFERENCES (on PC, under FILE or EDIT). In the bottom-left of the Preferences pane, choose MANAGE and LOAD ALL PREFERENCES. Choose the file: “Hattem-Scrivener-Preferences.prefs”
2) Back in the project, choose COMPILE and FORMAT AS. Then MANAGE COMPILE FORMAT PRESETS and IMPORT. Choose the preset file “Chicago Compile Preset” and it will be available whenever you need to compile a project.
Great stuff. I’m just wondering how to use the presets for Chicago.
TO USE THE FILES LINKED TO IN THE POST:
1) Find PREFERENCES (on PC, under FILE or EDIT). In the bottom-left of the Preferences pane, choose MANAGE and LOAD ALL PREFERENCES. Choose the file: “Hattem-Scrivener-Preferences.prefs”
2) Back in the project, choose COMPILE and FORMAT AS. Then MANAGE COMPILE FORMAT PRESETS and IMPORT. Choose the preset file “Chicago Compile Preset” and it will be available whenever you need to compile a project.
Thanks, Michael!
Pingback: Course Planning with Scrivener – Smart Women Write
Hello! Really great stuff. I’m from Brazil and here isn’t common to use the Scriviner. But I’m really like it to use for my dissertation. My question is, do you use Scrivener when you transcribe quotes and notes directly from your documents (primary sources)? Or do you write in a paper, notebook or Word and then transcribed to Sriviner? (sorry my english!)
Michael, if this comment thread is still active, I’m interested in this question too. About to start my first nonfiction book, 90K words, and using Scrivener for the first time. I want to set up a system for notes and quotes from my sources. Thanks for any insight!
For quotes, I would copy or type the most useful quotes from the document (along with a summary) in the notebook section in the right sidebar so whenever I looked at the document in Scrivener, the notes and quotes would be there. For notes, I either used a Scrivener doc I kept in a folder called “Notes” or I also used Evernote, if I needed to take something down and wasn’t at home or had Scrivener open. Then I could use the share function in Evernote to import the note directly into Scrivener or just copy and paste the text from the Evernote note into my Scrivener notes document. Hope that helps!
Thank you Michael for sharing your knowledge. I also use Papers and love it.
I have used Scrivener for some shorter papers (compiling them to APA format) tweaking and adding references via papers magic cite. Works really well.
I am about to start writing my dissertation and wanted to use scrivener. I’m not sure how to find your files “attached to this post”….is there a link somewhere?
Thanks.
I meant to write: “I have used Scrivener for some shorter papers (compiling them to APA format) exporting to Word then tweaking and adding references via papers magic cite. Works really well.”
Pingback: Organizing Archival Research – Digitizing History
Thank you for this blog post and making available your preset files, Michael. It’s quite generous. I’m wondering if you might say a bit more about how you use Papers. The Papers screenshot from your earlier workflow post shows a degree of PDF organization that’s bordering on sublime, and I’m planning to begin using the program asap.
I’ve noticed there’s a Primary Sources folder in that screenshot, so you’re storing those in Papers, too? Everything goes there? Do you also convert your archival JPEGs to PDFs for storage there?
Jacob, in the beginning I did include primary sources in Papers (mostly PDFs of old newspapers). However, I quickly moved to simply storing them in my Scrivener project file and I continue to do that today. This is partly because my sources are specific to individual projects but also because Scrivener allows me to have a much more complex (though more easily navigable) multi-tiered folder structure for my primary sources. In Scrivener, I import JPGs taken at archives directly (though Papers will allow you to import images as well). It’s mostly a matter of preference and need.
Thank you, I appreciate the follow up!
A significant drawback of Scrivener for course management is that the main binder can only contain RTF files. You can put other file types down below in “Research,” but it is difficult to have a single folder per class, for example.
On the other hand, I had forgotten about using Collections. I suppose I can set up each class as a Collection, and then pull material from different places. I’ll try it.
Software that I use: EagleFiler for my document manager; OmniOutliner for outlining and taking notes; Nisus Writer Pro for writing (though I’m moving away from it as I use Scrivener more). Experimenting with DevonThink
That is a good point about the main binder, but since you won’t be “compiling” anything there’s no need to use the main binder as your main folder. I’ve used both OmniOutliner and DevonThink in the past and liked the latter much more than the former.
Tried the link and it no longer works.
Does anyone have a copy of the file?
Hi Michael,
Thank you for your invaluable advice, and for your generosity, in sharing these files. When I download them from drop-box the Scrivener Files folder is fine, but the three within it remain greyed out. I am working in Scrivener-3 and guess that is maybe why I can’t select them under Import Format? If you have any suggestions I would be most appreciative. I would like to add Chicago style dissertation settings.
Pingback: Scrivener ASVR Workshop 2020 | Lorelle Writes
Pingback: Scrivener Templates You Can Use [Download Here]